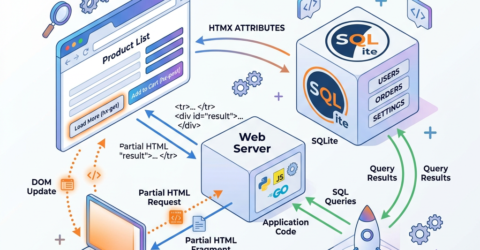
Introduction to htmx and SQLite
In modern web development, the demand for dynamic and responsive applications has significantly increased. One effective solution is htmx, a lightweight JavaScript library designed to enhance HTML with minimal effort. Unlike traditional JavaScript frameworks that require extensive code for making web pages dynamic, htmx allows developers to leverage HTML attributes to facilitate server communication efficiently. This approach simplifies the interaction between clients and servers, enabling the creation of more interactive user interfaces without a steep learning curve.
htmx operates by enabling attributes like hx-get, hx-post, and hx-trigger, allowing developers to specify how elements should interact with the server. This not only reduces the amount of JavaScript required but also streamlines the development process, making it accessible for those who prefer working directly with HTML. Furthermore, it promotes a more declarative style of coding, which can enhance overall maintainability.
On the other hand, when it comes to databases, SQLite stands out as an ideal choice for small-scale applications. It is a self-contained, serverless database engine that offers a complete SQL database in a single file. One of the primary advantages of SQLite is its simplicity; there is no need for a separate server process, making it easy to set up and manage. This characteristic is particularly beneficial for developers building small applications or prototypes, as it eliminates the overhead associated with more complex database systems.
SQLite supports a wide range of SQL commands and is highly efficient for read-heavy workloads. Its ease of integration with various programming environments further reinforces its appeal. By utilizing htmx for dynamic user interfaces alongside SQLite for data storage, developers can create efficient and responsive web applications that are easy to develop and maintain.
Setting Up the Development Environment
To build a simple todo application using htmx and SQLite, it is essential to start with a properly configured development environment. This ensures you have all the necessary tools at your disposal for effective application development.
The first step is to install Python, which serves as the programming language for the backend. You can download the latest version of Python from the official Python website. Ensure that you select the option to add Python to your system path during installation, as this will simplify running Python commands in your terminal.
After successfully installing Python, you will need to set up a virtual environment. This can be accomplished by navigating to your project directory in the terminal and executing the command:
python -m venv venvActivate the virtual environment using the command corresponding to your operating system:
- On Windows:
venv\Scripts\activate - On macOS/Linux:
source venv/bin/activate
Next, you will need to install Flask, which is a lightweight web framework for building web applications in Python. This can be installed using pip, the package installer for Python. Execute the following command in your terminal:
pip install FlaskOnce Flask is set up, the next step is to install SQLite. SQLite is often bundled with Python installations, but if it is not already available, you can install it by downloading the appropriate files from the SQLite download page.
Finally, you will need to include htmx for enhancing the frontend of your application. This can be easily linked in your HTML files either by downloading it or using a CDN. To include it via a CDN, add the following script tag in your HTML file:
<script src="https://unpkg.com/htmx.org"></script>By following these steps, you will have established a solid development environment that is crucial for creating your todo application.
Creating the SQLite Database
Creating an SQLite database for your Todo application is a fundamental step that allows for the efficient management of todos. To get started, you first need to create a new database file. This can easily be accomplished using the SQLite command line interface or through a script, depending on your preference. The command to create a new database file is as simple as opening the SQLite CLI and entering:
sqlite3 todos.db
In this example, “todos.db” is the name of the database file being created. If the file does not exist, SQLite will create it. Once you are in the SQLite prompt, you can begin defining the necessary tables for the todo application.
The core table needed for our Todo application is the “todos” table. This table will hold the essential information regarding each task. The SQL command to create this table can be defined as follows:
CREATE TABLE todos ( id INTEGER PRIMARY KEY AUTOINCREMENT, title TEXT NOT NULL, completed BOOLEAN NOT NULL DEFAULT 0);
In the command above, we define three columns: id, which serves as a unique identifier for each todo item, title, which stores the description of the task, and completed, a boolean value indicating whether the task is completed or not.
After executing the commands to create the database file and the todos table, it is advisable to verify the structure by running a simple query:
SELECT * FROM todos;
This command will confirm that your table is correctly set up, and you will be ready to proceed with developing your application functionalities. Overall, establishing the SQLite database lays a solid foundation for the todo application, ensuring organized and efficient data management.
Building the Basic Flask Application
To create a basic Flask application, it is essential to start by setting up the Flask framework within your development environment. Begin by establishing a new directory for your project and navigating to it in your terminal. Next, use the command pip install Flask to install Flask if you haven’t already done so. This library serves as the backbone for handling the application’s web requests.
Once Flask is installed, create a Python file named app.py. In this file, you will initialize the Flask application and create essential routes that can handle requests. Start by importing the Flask class and then instantiate your application with app = Flask(__name__). By doing this, you have prepared your application to respond to web requests.
Define at least one route. A simple example is:
@app.route('/')def index(): return "Welcome to the Todo Application!"This route will respond to requests at the root URL by returning a welcome message. Next, extend the implementation to serve dynamic content and handle user actions for the todo application.
Integrating SQLite requires a few more steps. SQLite serves as the database backend for storing todo items persistently. To begin, use the command pip install Flask-SQLAlchemy for installing Flask-SQLAlchemy, an extension that makes working with databases easy. In your app.py, set up an SQLite database configuration using the following code:
from flask_sqlalchemy import SQLAlchemyapp.config['SQLALCHEMY_DATABASE_URI'] = 'sqlite:///todo.db'db = SQLAlchemy(app)This configuration informs Flask to use SQLite as the database. You can then create models corresponding to your todo items, which will facilitate interactions with the SQLite database.
Now that you have the basic components in place, you can structure your files appropriately, ensuring a clean organization. This typically includes creating separate folders for templates and static files. By following these steps, you lay the groundwork necessary for building a functional todo application using Flask and SQLite.
Integrating htmx for Dynamic Functionality
Integrating htmx into your Flask application can significantly enhance its interactivity with minimal JavaScript. htmx allows you to make AJAX requests easily by adding specific attributes to your HTML elements, thereby simplifying the process of creating dynamic functionality such as adding, completing, and deleting todos.
To start utilizing htmx, first ensure that the library is included in your application’s frontend. You can do this by adding the htmx script to your HTML header as follows:
<script src="https://unpkg.com/htmx.org@1.6.1" integrity="sha384-O4zE9ZD..." crossorigin="anonymous"></script>Once htmx is set up, you can enable users to add new todos via a simple form. For instance, a form to input a todo item might look like this:
<form hx-post="/add_todo" hx-target="#todo-list"> <input type="text" name="todo" required> <button type="submit">Add Todo</button></form>In this example, when the form is submitted, htmx will send a POST request to your Flask endpoint that processes the addition of a new todo. The response can then be rendered directly into the HTML element with the ID of “todo-list”, updating the displayed list seamlessly without needing a full page refresh.
Additionally, you can enhance user interaction by enabling the completion of todos with a simple checkbox. By adding the following code, the checkbox can trigger a feature to mark todos as complete:
<input type="checkbox" hx-post="/complete_todo/{id}" hx-target="this.parentNode">In this manner, htmx automatically handles the request to mark the todo as complete. The response can be adjusted to update the checkbox’s state visually. This technique avoids the need for extensive JavaScript while still providing a responsive user experience.
Deleting items can be accomplished similarly, with the use of a button triggering a DELETE request through htmx attributes, simplifying your code while keeping the application efficient. By streamlining dynamic interactions with htmx, your todo application becomes not only functional but also user-friendly, demonstrating how effective integrations can greatly enhance web applications.
Creating the Todo Application User Interface
In developing a simple Todo application, the user interface plays a crucial role in ensuring user engagement and usability. A clean and intuitive UI helps users manage their tasks effectively. In this section, we will discuss how to construct a user-friendly interface using HTML and CSS.
To begin with, the structure of the application should include essential elements such as an input field to add new tasks, a list to display existing tasks, and buttons for user interactions such as adding or deleting tasks. We will utilize HTML to layout these components clearly and functionally. For example, an input form can be created using the <form> element that allows users to submit their tasks. Each task can be presented within an <ul> element, with individual items encapsulated in <li> elements.
Styling these elements effectively is key to enhancing the overall user experience. By applying CSS, one can ensure that the application appears organized and visually appealing. Consider using a minimalistic design with sufficient white space to make the app less cluttered. For example, setting margins, padding, and font styles can significantly impact readability and navigation.
Furthermore, integrating htmx into the application is essential for seamless interaction with backend Flask routes. Each action taken by the user, such as submitting a new task or deleting an existing task, can trigger an htmx request to the corresponding Flask route. This communication facilitates dynamic updates to the UI without requiring a full page refresh, thus enhancing user experience and responsiveness.
In summary, a carefully designed user interface for the Todo application not only improves aesthetics but also ensures connectivity with the back-end logic through htmx. Achieving a functional and attractive UI is key to the application’s success in fulfilling its purpose of task management.
Implementing CRUD Operations
The implementation of CRUD operations—Create, Read, Update, and Delete—is fundamental to any application that requires data management, particularly in a simple Todo application using htmx and SQLite. These operations facilitate dynamic interactions between the front end and back end, allowing users to manage their tasks efficiently.
To start, setting up the back end to handle CRUD operations requires a basic understanding of SQLite queries. First, the Create operation can be executed by sending a POST request to the server whenever a user adds a new todo item. This request will include the necessary data, which the server processes and stores in the SQLite database. Upon successful addition, htmx allows for instant feedback to be provided by returning the new todo item’s HTML fragment, which can be directly inserted into the DOM.
Next, the Read operation involves retrieving data from the database. When the application initializes, a GET request can fetch all todo items from SQLite. The response will then be rendered on the page, providing users with an immediate view of their tasks. For seamless user experience, htmx ensures that only the relevant section of the page is updated, eliminating the need for full page reloads.
Updating tasks can be managed via a PUT request, where users can modify existing entries. When a user submits an edit, htmx captures the input, sends this update to the server, and modifies the corresponding database record. After a successful update, htmx will replace the updated item without any disruption to other listed tasks.
Lastly, for the Delete operation, sending a DELETE request upon user confirmation allows the application to remove tasks from both the user interface and the SQLite database effectively. htmx, when integrated appropriately, can dynamically reflect these changes, ensuring that any deleted tasks disappear instantly from the user’s view.
Testing the Application
Testing is a crucial step in the development process of a todo application. It ensures that the application is functioning as intended and that any potential issues are identified and resolved before deployment. This assessment can be broken down into two primary types: unit testing and functional testing.
Unit testing focuses on the individual components of the application, particularly the database interactions that manage todo items. By utilizing frameworks such as pytest in conjunction with SQLite, developers can create test cases for every function that directly interacts with the database. These tests should cover scenarios such as adding new todo items, updating existing ones, deleting items, and querying the database for specific data. Each of these operations must be tested to verify that they behave as expected. For instance, a test could check that after adding a todo item, it appears in the query results.
On the other hand, functional testing evaluates the overall system performance, ensuring that all components work together cohesively. This type of testing often involves simulating user interactions with the application through its user interface, ideally automating these tests through tools such as Selenium. Functional tests should verify that tasks can be added and marked as complete, as well as assessing the responsiveness of the application when interacting with various modules.
Best practices suggest documenting both types of tests to ensure clarity and maintainability. It is imperative to run tests regularly throughout the development lifecycle to catch issues early. Furthermore, continuous integration and deployment (CI/CD) practices can greatly enhance the efficiency of the testing process, as they enable automatic running of tests upon code changes.
Through diligent testing, developers can significantly reduce the likelihood of encountering bugs post-deployment, thereby enhancing user satisfaction and the overall success of the todo application.
Conclusion and Next Steps
In this tutorial, we have successfully built a simple todo application utilizing htmx for dynamic user interaction and SQLite as our backend database. Throughout the process, we explored the essentials of htmx, such as enhancing page interactions without requiring full page reloads, which significantly improved the user experience. Additionally, we leveraged SQLite for its lightweight nature, which is particularly beneficial for small applications and prototypes.
The key takeaways from this project include understanding how to create an interactive web application using htmx, how to effectively manage a database with SQLite, and the importance of coding best practices to ensure maintainability and scalability. This foundational knowledge equips you with the skills to expand your application further.
Looking ahead, there are ample opportunities to enhance your todo application. Consider integrating features such as user authentication to allow for personalized task management, or adding a categorization system to sort tasks more effectively. Exploring more advanced functionalities of htmx can also be beneficial; for example, implementing real-time notifications or leveraging htmx’s built-in support for seamless transitions can take your application to a new level of interactivity.
Furthermore, you might want to deploy your application to a cloud service for public access. This process introduces you to the concepts of web hosting and database management in production environments. Whether you choose to self-host or use popular platforms like Heroku or Vercel, deploying your application will help you understand practical considerations regarding scalability and performance.
In summary, building a todo application with htmx and SQLite offers numerous learning opportunities. By enhancing the application with advanced features and understanding deployment, you can refine your skills and prepare for more complex projects in the future.